20-Minute Scratch Snack Bars That Actually Hold Up in a 4-Year-Old's Lunchbox

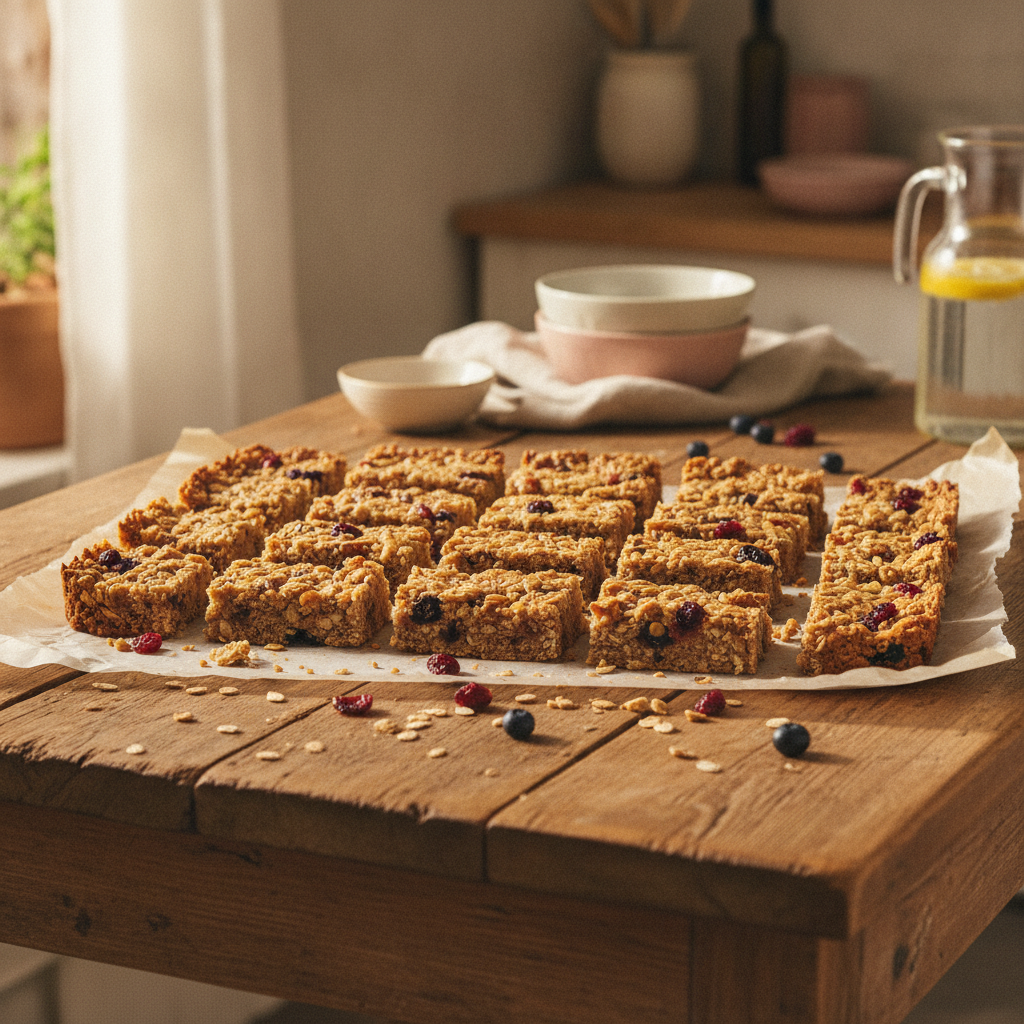
Stop buying overpriced, processed store bars full of mystery ingredients. You can bake these easy, scratch-made oat and berry bars in just 20 minutes with real pantry staples, keeping your kid satisfied all school week without any packaged shortcuts.
On this page
Listen… if I have to open one more store-bought lunchbox snack with a label full of words I cannot pronounce, I might actually lose my mind right here on the kitchen tile. 😅
Around our house in Colorado Springs, mornings move FAST. Luke is four years old, full of wild energy, and currently living in head-to-toe camouflage while he pretends our living room rug is a frozen lake from Outdoor Boys. On school days, I am his alarm clock, going in at 6:30 AM to peel him out of bed. By 7:30 AM, he is bouncing off the walls, asking if we can take the truck down to the park or go fishing before kindergarten drop-off. Meanwhile, Hubs is upstairs in his home office starting his workday, and I am downstairs trying to wrangle shoes, pack lunchboxes, and keep our home running without resorting to boxed, frozen junk.
Here is the thing about my kitchen philosophy: I cook from scratch. Period. We do not do frozen nuggets, boxed toaster pastries, or pre-packaged snack bars packed with high-fructose corn syrup and preservatives. But being a stay-at-home mom means my time is valuable, and mornings are tight. When Luke has school, I need real, wholesome, scratch-made food that I can throw into his lunchbox in seconds without spending my entire Sunday evening stuck at the stove.
That is how these 20-minute scratch-baked snack bars were born. They are thick, chewy, crazy easy to make, and take literally twenty minutes in the oven. Best of all? They do not turn into a pile of sad crumbs at the bottom of a four-year-old’s bag.
Grab a fresh cup of coffee, sit back, and let’s talk about how to make scratch baking actually fit into your real life.
Why Are We Baking Snack Bars From Scratch Anyway?
I get asked this all the time by other mamas at school pickup. “Annie, you really bake all his snacks from scratch? How do you have the energy?”
Listen, friend—I am not superwoman. I get exhausted just like everyone else! Bedtime around here is 8:30 PM sharp, and by 8:31 PM I am usually stretched out on the couch exhausted. But making food from scratch is not about being perfect; it is about knowing exactly what is fueling my kid’s body.
When you look at store-bought granola bars or breakfast squares, they are loaded with refined oils, synthetic flavorings, and way too much sugar. Plus, half of them contain applesauce or dried apple fillers. Luke strictly HATES apples (and do not even get me started on his deep, passionate hatred for mashed potatoes 🙈). If a snack bar has hidden apple fiber in it, he will take one bite, detect it immediately with his four-year-old radar, and refuse to touch it.
When you bake from scratch at home:
- You control every single ingredient. Pure butter, real raw honey or maple syrup, whole grain oats, and actual fresh fruit.
- You save serious money. Buying individual organic bars gets wildly expensive. Oats, butter, and seeds bought in bulk cost pennies by comparison.
- You can customize for school allergy rules. Most kindergarten classrooms are completely nut-free. Making these with sunflower seed butter keeps everyone safe while keeping the protein high.
- They taste a million times better. Freshly baked oats and melted dark chocolate chips beat stale, foil-wrapped factory bars every day of the week.
What Makes a Snack Bar Truly “Lunchbox-Proof”?
Not all homemade bars are created equal. Have you ever tried making a “healthy” web recipe only to cut into it and watch it disintegrate into dry birdseed? Yeah, me too. Hell, I have thrown out entire pans of crumbly oats in my day!
To make a bar that survives a rugged four-year-old taking his backpack on the school bus, your recipe needs three structural pillars:
- The Binding Binder: You need a solid ratio of real wet binders to dry grains. Melted grass-fed butter combined with raw honey and scratch-made seed butter creates a glue that thickens as it bakes.
- The Parchment Press Technique: Before the pan goes into the oven, you must pack the mixture down with absolute brute force. Use the bottom of a flat glass or measuring cup lined with parchment paper to compact the oats into a dense sheet.
- The Cool-Down Chill: NEVER try to cut these hot out of the oven! They will crumble into chaos. Let them cool completely on the counter, then pop the pan in the fridge for 30 minutes before slicing. That sets the butter and honey solid.
Recipe #1: The 20-Minute Wild Berry & Honey Scratch Bar
This is the absolute MVP in our house. It is sweet, tart, packed with rolled oats, and completely apple-free. Luke loves taking these on morning trips when we go hiking or gear up for outdoor fishing once school lets out.
What You Need:
- Rolled Oats: 2.5 cups of old-fashioned rolled oats (do not use instant oats; they get mushy!).
- Butter: 1/2 cup (one stick) of unsalted organic butter, melted.
- Honey: 1/3 cup of raw local honey.
- Sunflower Seed Butter: 1/3 cup (make your own by blending toasted sunflower seeds or buy pure seed butter).
- Fresh Berries: 3/4 cup of fresh blueberries or finely diced strawberries (avoid frozen berries here, as they add too much water).
- Vanilla Extract & Sea Salt: 1 teaspoon vanilla extract, 1/2 teaspoon fine sea salt.
How to Make It:
- Pre-heat your oven to 350°F (175°C) and line an 8x8 metal baking pan with parchment paper, leaving overhang edges for easy lifting.
- In a large mixing bowl, whisk together the melted butter, honey, sunflower seed butter, vanilla, and sea salt until smooth and creamy.
- Fold in the rolled oats until every single flake is coated in the wet mixture.
- Gently fold in your fresh diced berries so they do not burst completely.
- Press the mixture firmly into your lined pan. Press hard! You want this layer tight and even.
- Bake for 18 to 22 minutes until the edges are golden brown.
- Remove from the oven, cool completely at room temperature, then chill in the fridge for 30 minutes before slicing into 10 sturdy bars.
Recipe #2: The Nut-Free Sunbutter & Dark Chocolate Chewy Bar
If your kid craves that classic chocolate chip granola bar vibe, this recipe is pure gold. It feels like a treat, but it is loaded with real fat, complex carbs, and clean energy to keep a busy four-year-old going until pickup time.
What You Need:
- Rolled Oats: 2 cups old-fashioned oats.
- Unsweetened Shredded Coconut: 1/2 cup (adds great texture and healthy fat).
- Butter: 6 tablespoons unsalted butter, melted.
- Maple Syrup: 1/3 cup pure grade-A maple syrup.
- Sunflower Seed Butter: 1/2 cup creamy sunbutter.
- Dark Chocolate Chips: 1/2 cup mini dark chocolate chips (mini chips distribute better so every bite gets some chocolate goodness!).
- Sea Salt: 1/2 teaspoon.
How to Make It:
- Preheat your oven to 350°F and line an 8x8 pan with parchment paper.
- In a bowl, combine the melted butter, pure maple syrup, sunbutter, and sea salt. Stir until completely unified.
- Stir in the oats and shredded coconut.
- Let the mixture cool for 5 minutes (so your chocolate chips don’t turn into a melted muddy river!), then fold in the mini dark chocolate chips.
- Pack into the pan using your flat measuring cup press technique.
- Bake for 20 minutes sharp until the top looks set and golden.
- Chill in the fridge, lift out using parchment handles, and slice into bars or bite-sized squares.
Hubs loves sneaking downstairs from his home office right around 2:00 PM when these are chilling in the fridge. I usually have to guard the pan so there are actually bars left for Luke’s school lunches! 😂
What Else Goes in Luke’s Lunchbox Alongside These Bars?
Since we don’t rely on boxed convenience items, building a lunchbox takes a tiny bit of routine planning. But once you get your groove down, it takes literally five minutes in the morning before school drop-off.
Here is what a typical scratch-made kindergarten lunch looks like in Luke’s bag:
- Main Course: Homemade sushi rolls (we do simple avocado and cucumber or cooked salmon rolls at home!), leftover chicken piccata sliced into strips, or his absolute holy grail—the scratch-made hard-boiled egg sandwich I make for our road trips and fishing outings.
- Fresh Fruit: Giant chunks of fresh watermelon (his absolute favorite thing on earth) or fresh blackberries.
- The Scratch Bar: One of our 20-minute homemade oat bars wrapped in a small piece of unbleached wax paper.
- Hydration: A stainless steel bottle filled with cold water.
Notice what is missing? Zero plastic wrappers, zero fake colors, zero processed junk. Just real, hearty food that keeps a wild 4-year-old satisfied through kindergarten circle time, outdoor playground fun, and the ride home in the truck. And no apples — which has nothing to do with apples being unhealthy, because obviously they are not. Luke has simply hated them since he could talk, and I stopped packing food that comes home untouched.
Storing & Freezing: How to Prep a Month of Bars in Advance
Since stay-at-home life means constantly balancing home maintenance, cooking, laundry, and playing outdoors, I am all about working smarter in the kitchen. I don’t want to bake every single day!
Here is my simple storage strategy:
- Counter Storage: Keep sliced bars in a sealed airtight glass container on the counter for up to 3 days.
- Fridge Storage: Store them in the fridge for up to 7-10 days. Cold bars stay extra chewy and dense!
- Freezer Batching: Double the recipe! Slice the cooled bars, lay them on a baking sheet to freeze individually for 1 hour, then dump them into a freezer-safe container separated by parchment paper. They freeze beautifully for up to 3 months.
On crazy busy mornings when we are running a few minutes behind our 6:30 AM wake-up, I just grab a frozen bar right out of the freezer and pop it directly into Luke’s lunchbox. By lunchtime at school, it is perfectly thawed, fresh, and soft!
Honest Pros and Cons of Scratch-Baking Lunchbox Bars
I promised you friend-on-the-couch honesty, mama, so let’s lay out the real pros and cons of skipping store-bought bars and baking from scratch.
The Pros:
- Unbeatable Quality: You know every single ingredient going into your child’s body. No seed oils, no mystery preservatives, no artificially added fillers.
- 100% Allergy & School Friendly: You can make these completely nut-free for school allergy compliance without buying special expensive brand-name boxes.
- Customizable Flavor: Pick fruits and flavors your kid actually likes. If they hate apples like Luke, you can stick strictly to berries, coconut, or dark chocolate.
- Zero Packaging Waste: No single-use foil wrappers cluttering up your trash or nature trails when you take them outdoors.
The Cons:
- Slightly Shorter Shelf Life: Because there are no chemical preservatives, these will not sit in a pantry for two years like factory bars. You need to store them properly in the fridge or freezer.
- Requires 20 Minutes of Prep/Bake Time: You actually have to turn on your oven and clean a mixing bowl. It is quick, but it is still work.
- Requires Cooling Time: You cannot bake these 5 minutes before running out the door for drop-off. They need time to chill in the fridge so they firm up before cutting.
Mama-to-Mama Kitchen Tips for Recipe Success
If you are ready to give these a shot this week, here are a few final tips from my kitchen to yours:
- Use Real Butter: Don’t substitute vegetable oil or margarine! Real butter provides the rich structure and delicious flavor that bakes into every oat.
- Get the Kids Involved: Luke loves helping pour the oats and stir the honey into the bowl. Getting your four-year-old into the kitchen helps picky eaters become way more excited about eating real food!
- Line the Pan Properly: Always use parchment paper with extra hanging over the edges. Trying to dig bars out of an unlined metal pan with a spatula is a total nightmare.
- Double the Batch: If you are already turning on the oven, bake two pans side-by-side. Freeze the second pan’s worth so you are covered for weeks ahead.
You do not need to be a professional baker or have a pristine aesthetic kitchen to feed your family real, incredible, scratch-made food. You just need twenty minutes, basic pantry staples, and a little love.
Try these out for your next school week and let me know how your little ones love them! Now if you’ll excuse me, Luke is dressed in his full camo outfit waiting by the front door with his rod, ready to head down to the park before we start our afternoon routine. Catch you later, friend! 🌲 reel it in!
Affiliate link — if you sign up or buy through it, My Mama Mode may earn a small commission at no extra cost to you. As an Amazon Associate, My Mama Mode earns from qualifying purchases. My Mama Mode also participates in other retailer affiliate programs. Learn more.
Frequently asked
Yes! Use pure sunflower seed butter (sunbutter) instead of peanut or almond butter. It binds the oats beautifully, tastes rich, and is 100% school-safe for nut-free kindergarten classrooms.
Crumbles usually happen if you cut the bars while they are still warm or if they weren't packed down tightly enough in the pan. Be sure to press the oat mixture firmly before baking, and let the pan chill in the fridge for 30 minutes before slicing.
They freeze exceptionally well for up to 3 months when stored in an airtight container separated by layers of parchment paper. You can pack a frozen bar straight into a lunchbox in the morning, and it will be perfectly thawed by lunchtime.
Tap the one that fits, mama — no comment box, no pressure ✦
Keep reading, mama
Scratch High-Protein Pancakes That Keep My Wild Kindergartner Full Until Lunch
Ditch the processed boxed mix! Learn how to make fast, delicious, high-protein scratch pancakes that fuel active kids through busy school mornings.
Make-Ahead Freezer Meals That Save Our Busy Colorado Weeks
Make-ahead Italian freezer meals from scratch — lasagna, chicken piccata, braciole and meatballs — plus the batch prep system behind them.
Snacks We Make Together: Easy Kitchen Wins With a Little Helper
Easy, low-mess no-bake snacks you can make with your 4-year-old! Simple recipes, real kitchen tips, and zero-stress fun with boy mom Annie.